How to Download Files from URLs with JavaScript
Navigating the world of web programming can be a challenging endeavor. Let’s dive into a specific topic that might help you on your journey: downloading files from URLs using JavaScript.
You and I know how crucial it is to understand the basics of this powerful language. One task you’ll likely encounter is fetching data from a URL and saving it as a file. It sounds complicated, doesn’t it? Don’t worry, we’ll break this down together.
In this post, we will be looking at the following 3 ways to download files from URLs with JavaScript:
- By creating an anchor element and triggering a click event
- By using the Fetch API and FileSaver.js library
- By using XMLHttpRequest and Blob objects
Let’s explore each…
#1 – By creating an anchor element and triggering a click event
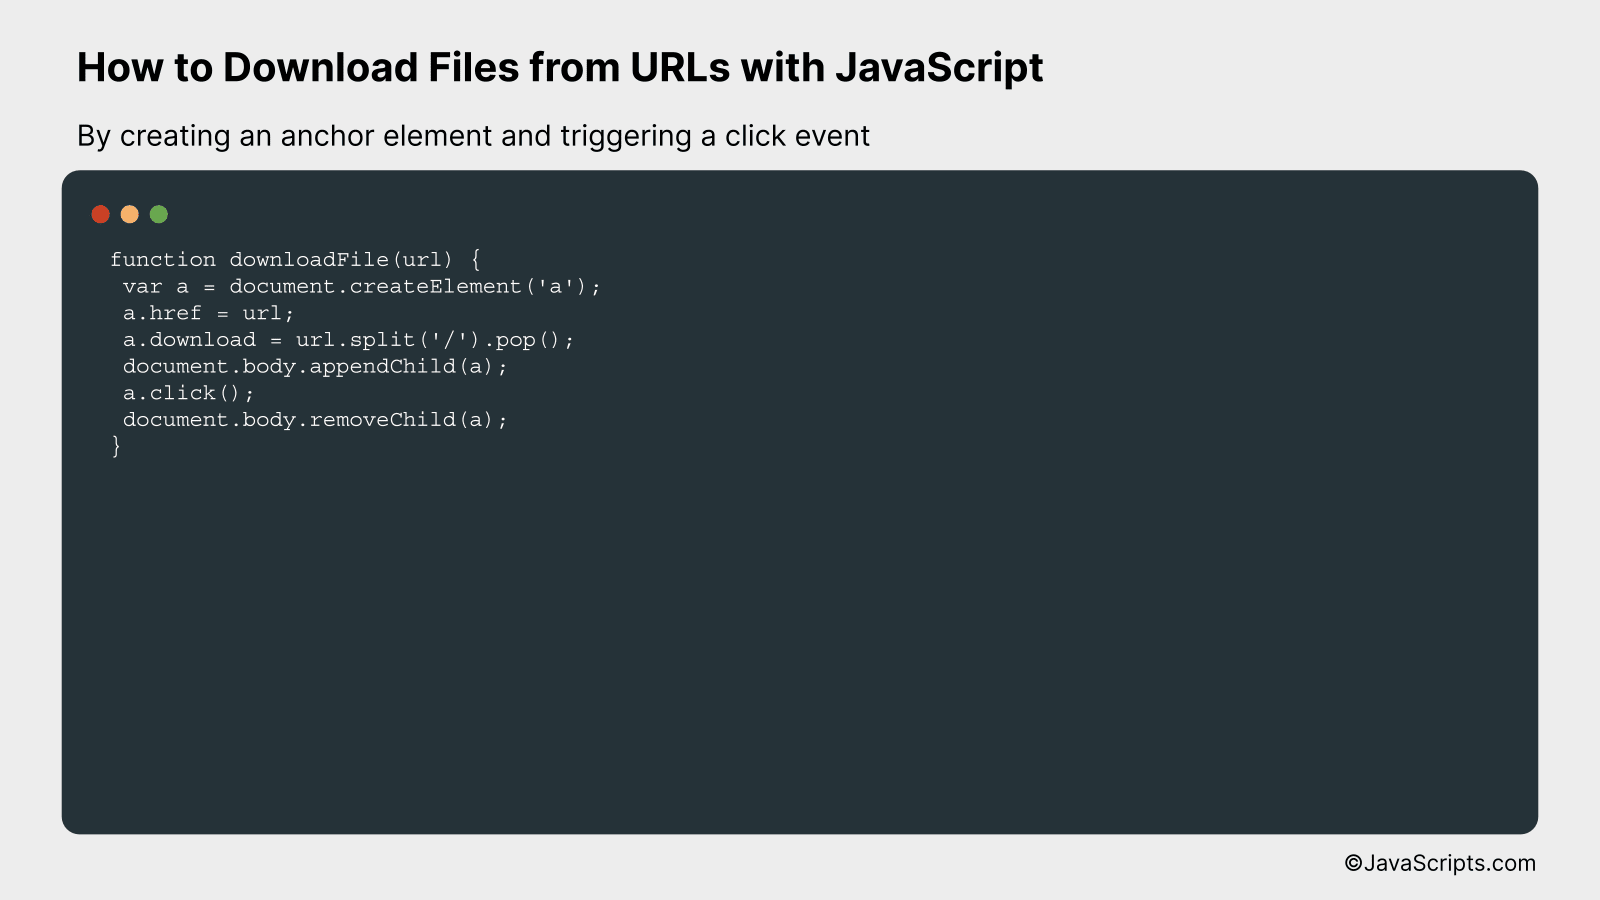
This method involves creating a ‘virtual’ anchor element, setting its ‘href’ attribute to the file URL, and programmatically triggering a click event to initiate the download. We can better understand this via a practical example.
function downloadFile(url) {
 var a = document.createElement('a');
 a.href = url;
 a.download = url.split('/').pop();
 document.body.appendChild(a);
 a.click();
 document.body.removeChild(a);
}
How it works
This JavaScript function works by dynamically creating a hyperlink that points to the file’s URL and then programmatically ‘clicks’ it to start the download.
- An anchor tag is created using
document.createElement('a'). - The href attribute of this anchor tag is set to the URL of the file to download using
a.href = url. - The download attribute of the anchor tag is set to the filename extracted from the URL, allowing us to name the downloaded file.
- The anchor tag is appended to the document body using
document.body.appendChild(a). - A click event is then programmatically dispatched to this anchor tag using
a.click(). This triggers the download of the file. - Finally, the anchor tag is removed from the document body immediately after the click event using
document.body.removeChild(a).
#2 – By using the Fetch API and FileSaver.js library
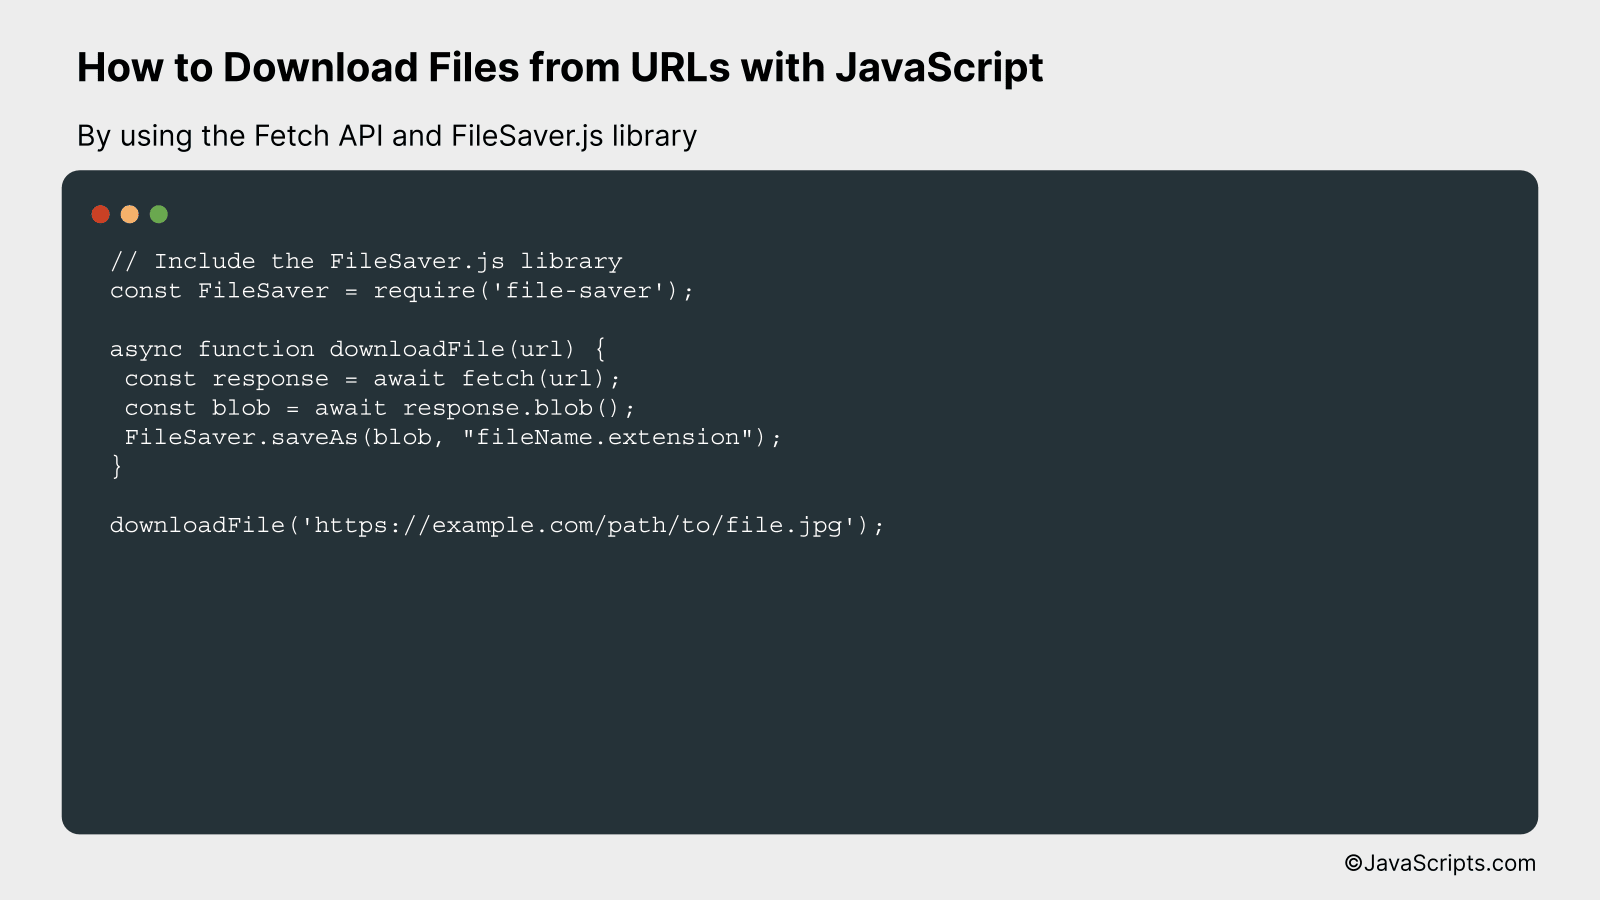
In this method, we will use JavaScript’s Fetch API and the FileSaver.js library to fetch and download files from URLs. The Fetch API allows us to request resources such as files from servers, while FileSaver.js enables us to trigger a file download on the client-side.
// Include the FileSaver.js library
const FileSaver = require('file-saver');

async function downloadFile(url) {
 const response = await fetch(url);
 const blob = await response.blob();
 FileSaver.saveAs(blob, "fileName.extension");
}

downloadFile('https://example.com/path/to/file.jpg');
How it works:
We use JavaScript’s Fetch API to retrieve the file from the specified URL. Then, we convert the response into a blob object. Using the FileSaver.js library, we trigger the file download on the client side with the specified filename and extension.
- First, we make sure to include the FileSaver.js library. We use require to import the library and assign it to the FileSaver variable.
- We define an asynchronous function named ‘downloadFile’, which takes in a URL as a parameter.
- Inside this function, we use the Fetch API to make a request to the URL we passed in. We use ‘await’ to wait for the Promise to resolve with the Response object.
- Once we have the Response object, we convert it into a Blob using the ‘blob()’ method. A Blob object represents a file-like object of immutable, raw data. Again, we use ‘await’ to wait for the Promise to resolve with the Blob.
- We then use the ‘saveAs’ function from the FileSaver.js library. This function triggers a file download on the client side. We pass in the Blob we received and a string with the desired filename and extension.
- Finally, we call our ‘downloadFile’ function, passing in the URL of the file we want to download.
#3 – By using XMLHttpRequest and Blob objects
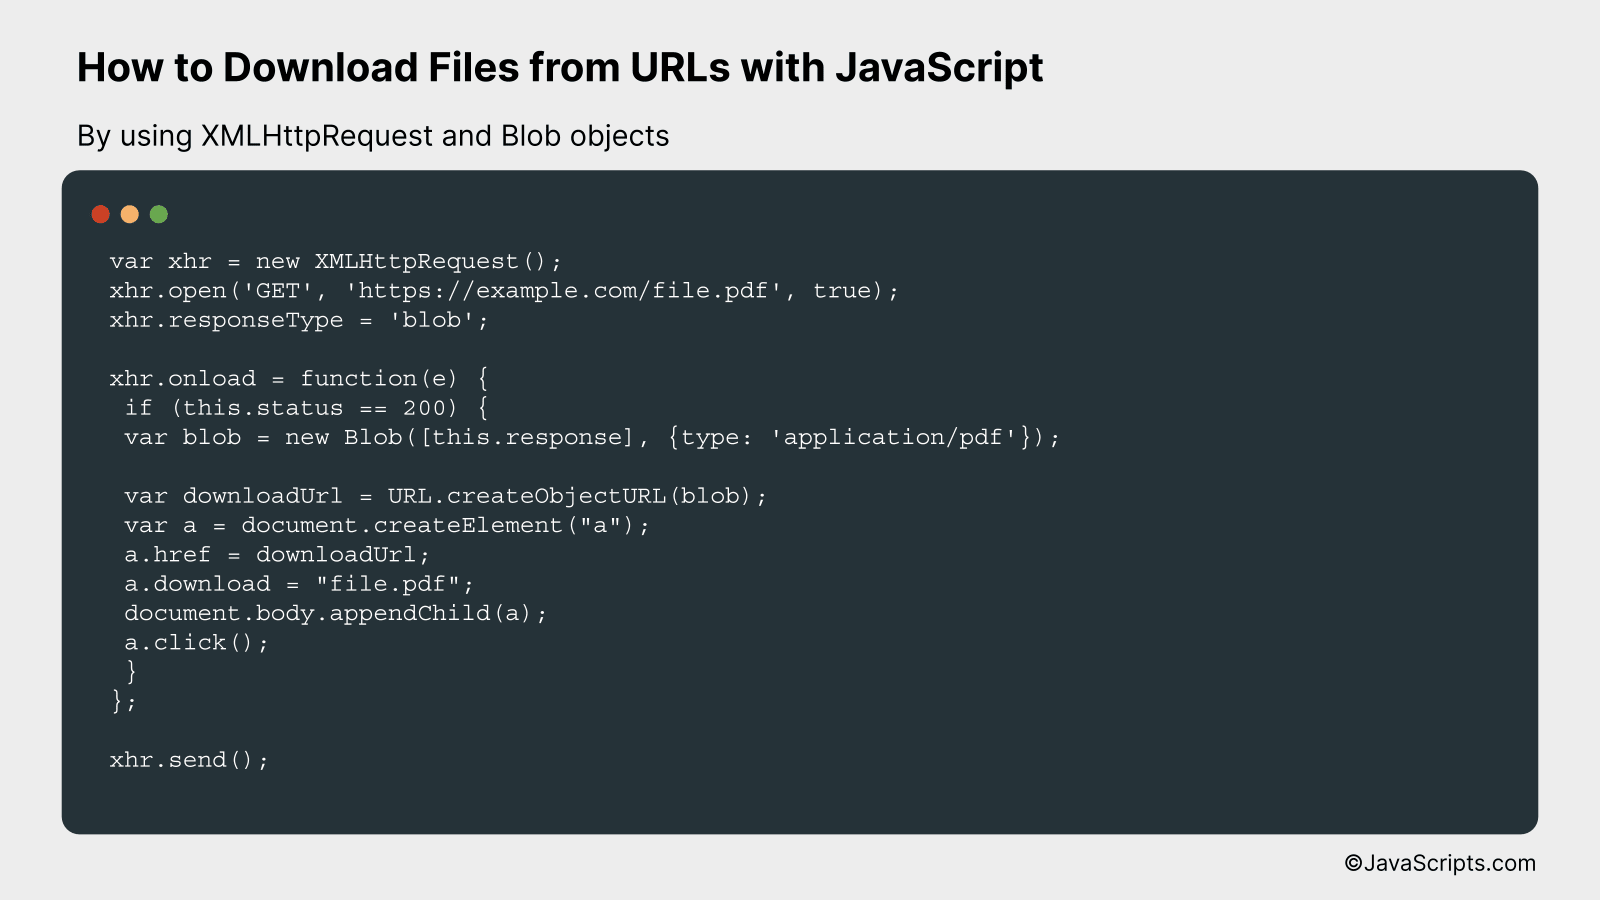
We will download files from given URLs in JavaScript using XMLHttpRequest to fetch the file and Blob objects to handle and download the file. This can be better understood by looking at the following example.
var xhr = new XMLHttpRequest();
xhr.open('GET', 'https://example.com/file.pdf', true);
xhr.responseType = 'blob';

xhr.onload = function(e) {
 if (this.status == 200) {
 var blob = new Blob([this.response], {type: 'application/pdf'});

 var downloadUrl = URL.createObjectURL(blob);
 var a = document.createElement("a");
 a.href = downloadUrl;
 a.download = "file.pdf";
 document.body.appendChild(a);
 a.click();
 }
};

xhr.send();
How it works
This method uses the XMLHttpRequest to fetch the file from the URL, and Blob objects to handle and download the file. Here is the step-by-step process:
- The XMLHttpRequest object ‘xhr’ is created and ‘open’ method is called with the ‘GET’ method and the URL of the file.
- ‘responseType’ of ‘xhr’ is set to ‘blob’ to declare that the response will be a Blob object representing the body content.
- An ‘onload’ event handler is set for ‘xhr’. This function is executed when the request successfully completes.
- Inside the ‘onload’ function, we first check if the request was successful by checking if ‘status’ is 200 (HTTP status code for ‘OK’).
- If the request was successful, we create a new Blob object containing the response. In this case, the Blob object is created with the type ‘application/pdf’ but this should match the type of your file.
- We then create a URL for the Blob object using ‘URL.createObjectURL’.
- An anchor (‘a’) element is created and its ‘href’ attribute is set to the URL of the blob. The ‘download’ attribute is set to the name you wish the downloaded file to have.
- The anchor element is appended to the body and programmatically clicked to start the download.
Related:
- How to Check if a String Contains a Substring in JavaScript
- How to Change Image Source in JavaScript
- How to Access -1 Index in JavaScript Arrays
As we conclude, we’ve seen that downloading files from URLs using JavaScript isn’t as complicated as it might initially seem. With the right tools and knowledge, this process becomes quite straightforward.
Remember, the key is to understand how HTTP requests work and to use them effectively. Practice these JavaScript methods and you’ll be downloading files in no time!